Overview
What is DNS?
"msudenver.edu" is just the street address of the MSU Denver website. To figure out the "driving directions," if you will, your computer contacts a special server (called DNS, for Domain Name System) to figure out the route. That server tells your web browser that "msudenver.edu" actually means "141.193.213.20". The number, known as an IP address, is a far better description of where msudenver.edu actually lives.
Why would I need to change my DNS settings?
If your DNS server goes down... it's like your computer no longer has GPS! But you can simply switch to another public DNS server to resolve those issues. Like for example, if you are experiencing an issue reaching http://msudenver.edu when other sites seem to work, then this article will help you resolve that issue.
Before you begin...
This article is for personal computers, if you use a MSU Denver-owned device please do not follow these directions, instead consider connecting to GlobalProtect which can also resolve DNS issues. More information can be found here: What is GlobalProtect?
Before you change your DNS settings to use Level3 DNS settings, be sure to write down the current server addresses or settings on a piece of paper. It is very important that you keep these numbers for backup purposes, in case you need to revert to them at any time.
We also recommend that you print this page, in the event that you encounter a problem and need to refer to these instructions.
Instructions
The recommended DNS provider (Level3) IP addresses (IPv4) are as follows:
Windows
- Go to the Control Panel.
- Click Network and Internet > Network and Sharing Center > Change adapter settings.
-
Select the connection for which you want to configure Level3 DNS. For example:
- To change the settings for an Ethernet connection, right-click the Ethernet interface and select Properties.
- To change the settings for a wireless connection, right-click the Wi-Fi interface and select Properties.
If you are prompted for an administrator password or confirmation, type the password or provide confirmation.
-
Select the Networking tab. Under This connection uses the following items, select Internet Protocol Version 4 (TCP/IPv4) and then click Properties.
-
Click Advanced and select the DNS tab. If there are any DNS server IP addresses listed there, write them down for future reference, and remove them from this window.
-
Click OK.
-
Select Use the following DNS server addresses. If there are any IP addresses listed in the Preferred DNS server or Alternate DNS server, write them down for future reference.
-
Replace those addresses with the IP addresses of the Level3 DNS servers:
- For IPv4: 4.2.2.2 and/or 4.2.2.1
-
Test that your setup is working correctly; attempt to navigate to http://msudenver.edu in your web browser.
-
Repeat the procedure for additional network connections you want to change.


macOS
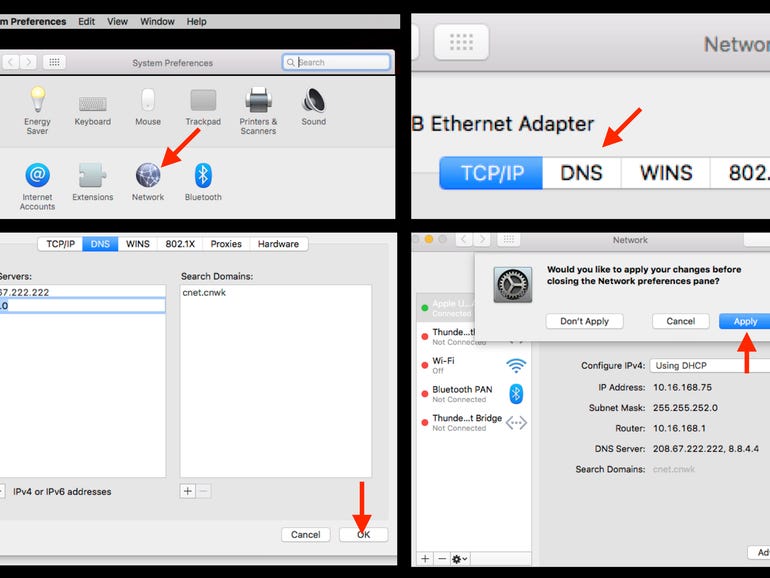
- Click Apple menu > System Preferences > Network.
- If the lock icon in the lower left-hand corner of the window is locked, click the lock icon to make changes, and when prompted to authenticate, enter your password.
- Select the connection for which you want to configure the new DNS settings. For example:
- To change the settings for a Wi-Fi connection, select Wi-Fi, and click Advanced.
- To change the settings for an Ethernet connection, select Built-In Ethernet, and click Advanced.
- Select the DNS tab.
- Click + to replace any listed addresses with, or add, the Level3 IP addresses at the top of the list:
- For IPv4: 4.2.2.2 and/or 4.2.2.1
- Click OK > Apply.
- Test that your setup is working correctly; attempt to navigate to http://msudenver.edu in your web browser.
- Repeat the procedure for additional network connections you want to change.

Result
Your computer will now use Level3 as its DNS.